Monday 10 July 2017

Steps to Use WhatsApp on a Computer/ Laptop


You can use WhatsApp on your computer through its web-based application called WhatsApp Web. If you spend a lot of time on your computer, it can be a good companion app. You don’t need to chat and connect through your phone since you can just do that by typing on your computer. All the messages you exchange, either on the web or on your phone, are synced so you can see everything on both devices.

1.Logging into WhatsApp Web


Visit WhatsApp Web. WhatsApp Web will work with Chrome, Firefox, Opera, and Safari, so open a new browser tab or window, and enter web.whatsapp.com in the address bar. You will see a QR code on your monitor. This code needs to be scanned from your phone so that you can activate and link your account.


Open WhatsApp on phone. Tap the WhatsApp app on your phone. The app icon has the WhatsApp logo on it, the one with a phone inside a chat box.

Access the WhatsApp Web Setting. Tap the gear icon or settings button of your phone to access the main menu of the app. Tap on “WhatsApp Web” from here. You will see a box for scanning a QR code on your screen.

Scan the code. Point your phone to your monitor where the QR code is. Position the box to read the QR code. No need to tap or press anything. Once the QR code has been read, you will be logged in to WhatsApp Web.

2.Reading Messages


View the WhatsApp Web interface. The WhatsApp Web interface is split into two panels. The left panel contains all your messages or chats, much like your inbox, and the right panel is where your current chat stream is. now you just chat with your whatsapp friends through computer web browser. 

Log out. When you’re done with WhatsApp Web, click on the button with three vertical dots on the header bar on the left panel. Click “Log out” from here. You will be logged out and brought back to the main WhatsApp Web page with the QR code.


Wednesday 14 June 2017

Play Store Error code 194 - 3 Easy Steps

Yet another Play store error that Android Users are facing. This time it is Play Store error 194. You may come through this error message when trying to Install or update any app from google play store. The error message exactly reads like "*App name* Could not be Downloaded due to an error. (194)" Just like Below Picture.


So what happens is you try to download or Update apps from play store but as soon as you click Install, You are presented with the Message showing Error Code 194. This error prevents you to Download any application on your android device.


Reasons of Play Store Error 194


Before we go deep and see Ways or Steps that you need to Perform to fix this error, let us just see why you get this Error. So Following are few Reasons you are getting this error in your android phone.
  1. Play Store Cache.
  2. Recent update to Play Store.
  3. Your network Connection.

There might be more reasons but above 3 are the most common ones. We are not here to simply discuss the reasons, We are literally gonna walk you through all possible Solutions to get rid of Error Code 194 in Play Store.


Ways to Fix Play Store Error 194


We will Be discussing 3 Different ways to fix the error. The Method mentioned below should help you to get rid of this play store error. They are sorted by Most basic and common Method to Advance.

Method 1: Clearing Cache

One of the Common way to fix various Errors in Google play store is Clearing the App Cache. Quite often only clearing the Cache of Google play store and Google Play Services will solve the issue. 

To Clear the Cache, simply navigate to Settings > Apps/Manage Apps > Google Play Store > Clear Cache and Data. Do the same for Google play services and Google play Framework.
if you are getting this Error 194 while updating the app then Clear cache and data of the app too. This should work and should not work. So don't panic and move on to below methods.


Method 2: Remove Google Account.

There might be problem with your google account which is causing this error on your phone. So in this Method we will try to Remove the account and add it again to see what happens.
  • Go to Settings > Accounts > Tab on your Google account and remove.
  • Reboot your phone
  • Go to Settings > Accounts > Add your account again and see if this solves the issue.

Method 3: Uninstall Play Store Update.

Play store updates itself whenever an update is available. Due to recently updated Play store, many a times it conflicts with apps and you get this and other kinds of errors. The Trick here is to Uninstall Play Store updates.

Navigate to Settings > Apps > Google Play store > Tap on the button that says Uninstall updates. This will uninstall the updates and you will now have your google play store version when it was first installed on your device. 

Now try and install the same app that was giving you Error Code 194 on your device. if this solves the issue then thank me Later or else checkout the Bonus Method that i am sharing below.

Free WannaCry Ransomware Decryption Tool

Free WannaCry Ransomware Decryption Tool


No need to pay ransomware; WannaCry decryption tool is available for free on GitHub

Researchers have finally been able to create a decryptor for the WannaCry ransomware that has affected more than 3,00,000 computers in 150 nations since its attack on computers running the Microsoft Windows operating system last Friday. For those unfamiliar, the WannaCry ransomware cryptoworm encrypts data and demands ransom payments from the infected computers in the Bitcoin cyrptocurrency.
Adrien Guinet, a French security researcher from Quarkslab, has discovered a method for finding the ransomware’s decryption key making use of a flaw in which WannaCry functions, according to The Hacker News.
Basically, WannaCry encryption creates a pair of keys – “public” and “private”. While the ransomware uses prime numbers to generate a “public” key, the “private” key is for encryption and decryption of the system files. WannaCry erases the keys from the system, thus compelling the victim to pay $300 to the cybercriminals.
However, Guinet found out that WannaCry “does not erase the prime numbers from memory before freeing the associated memory.” As a result, it allows a chance to retrieve the prime numbers and hence, generate the private key for decryption.
Using this information, Guinet released a tool called “WannaKey” that recovers the private key used to encrypt files on an infected system, allowing the contents of the files to be decrypted without paying the ransom demanded by WannaCry’s creators. The WannaKey decryption tool is available for free and works on Windows XP operating system.
However, the tool will only work on those affected computer that haven’t been rebooted after the attack or for computers with associated memory that have not been erased or allocated by some other processes, added Guinet.
Based on Guinet’s findings, another security researcher named Benjamin Delpy has created ‘WanaKiwi’, a tool that can unlock WannaCry infected systems. While it is similar to WannaKey in the way it functions, it is however compatible with Windows XP, Vista, 7, Server 2003, and Server 2008, and can run using the command prompt.

Users who are infected by the virus can download WannaKey tool or WannaKiwi tool fromGitHub and try it on their affected Windows.

Ways to recover data from a corrupt or damaged Memorycard card

Ways to recover data from a corrupt or damaged MicroSD card


SD cards have become the most convenient mode for data storage in devices such as smartphones, tablets, digital cameras, etc., as they are not only small in size but also light-weight and versatile. They can be used to store important files, images, and videos.But during the course of their use sometimes you are unable to access the files/images/videos or music stored on them. This happens because the data on SD cards gets accidentally deleted, or corrupted, formatted or damaged, and all the stored documents, photos, videos, and the music gets wiped off.
Such situations can be nightmarish and heart wrenching for the user. The very thought of losing important files/videos/images/music can be scary, but thankfully there are ways that can help you recover your data from the corrupted or damaged SD card.
In this article, we will provide tips on how you can recover files including photos, videos, and documents. You can reinstall lost apps and, if they come from a legal source, music files can be replaced free of charge.

Things you need to do before you start:-

1. Refrain from formatting the SD card, if you want to retain any of the photos on it.
2. Try using a different card reader. For instance, if you have inserted an SD card into your laptop or PC’s built-in slot and nothing is happening, then try using a different computer or a USB card reader. There are chances that the reader could be at fault and not the card. If this is the case, then look to buy a USB SD card reader online that accepts both microSD and standard SD cards.

File recovery software

There are several free SD card recovery software available in the market that claim to recover from corrupt or ‘dead’ memory cards. We have explained step by step how to use free EaseUS Data Recovery Wizard that helps you to easily and quickly get lost data back from memory card, Micro SD card, CF card or SDHC card etc. This SD card recovery tool can be applied to recover deleted, formatted, corrupted or lost pictures, music files, videos and other more important data.
If you are not comfortable using EaseUS Data Recovery Wizard, then you can try any other file recovery apps including MiniTool Data Recovery.

Points to remember:-

 Using such software does not guarantee the restoration of your lost files, as in some cases the original names of the file may be lost, while in some you may be able to rename the recovered files with no problem.
 Also, note that some free recovery programs have a limit on the number of files or amount of data they will recover. Therefore, check for any limitations before downloading. For instance, in the case of EaseUS Data Recovery Wizard, if your lost SD card files or data are more than 2GB, then you need to upgrade this free SD card recovery software into a pro version (EaseUS Data Recovery Wizard Pro) so that you can restore as many files as you want.
 Beware of additional unwanted programs that may get installed along with the free SD card recovery software. Never use the ‘Recommended’ installation option. Always, select ‘Manual’ and read each screen carefully, and opt out of search bars and other software.
Another free recovery program is ZAR (Zero Assumption Recovery), which is a comprehensive read-only data recovery solution. ZAR tools extract data from the damaged HDD to another medium (typically an additional HDD), leaving the original disk intact. Typical recoverable damage profiles include volumes accidentally formatted, corrupted by a virus or ill-behaved software, due to power failure or as a side effect of overclocking and so on.

How to install ZAR:-

1. Go to the ZAR website, click on the ZAR Download page, and download the installer for General File Recovery (there should be a file named zarXXsetup.exe where XX = the current version number).
2. Then insert the damaged SD card into your PC’s card reader and launch ZAR. (Since you may have to disable your PC’s security software, it is recommended that you disable the internet connection also).
3. When prompted, click the Image Recovery (Free) option. This will help you to recover photos from an SD card.
4. ZAR will now search for installed devices. You need to point it towards the offending SD card, choose the correct disk and click ‘Next’. ZAR will now analyse your SD card, which may take a few minutes.
5. Once completed, a list of all the recovered files will show up. On most of the SD cards, there are chances that clicking the ‘Root’ checkbox will choose all the images.
6. Click Next, and you can then choose the folder to place the recovered files. By default, this will be the same as the folder you have selected to save (so ‘Root’, in all likelihood).
7. Remember to select a destination folder for the recovered files when prompted for it. Ensure that you select the one on your PC’s hard disk and not the one on the corrupt SD card, since that won’t work.
8. Allow a few minutes for the files to copy on the destination folder. Once completed, go to the destination folder that you have chosen. You should be able to find most if not all of the files that you wanted to recover. There are chances that original names of the file may be lost, so you may have to rename them which could include adding a file extension so they are correctly recognised by Windows.

Tips for fixing a dead SD card:-

An SD card can be damaged in many ways making it difficult to access the data. For instance, the thin plastic shells of the standard size SD cards make them fragile and can be easily broken or damaged if carried unprotected in pocket or bag. Or at times, the little write-protection switch can fall out, making it difficult for the SD card to work in a camera or any other device that needs to be able to write to it.
In this state, regardless of the reason behind an SD card being write-protected, you won’t be able to delete the files, since the file allocation table needs to be changed and this involves writing to the card.
If your card is physically ok, and the switch (where present) is in the ‘unlocked’ position, you can try one of Windows’ built-in tools to attempt to fix it.
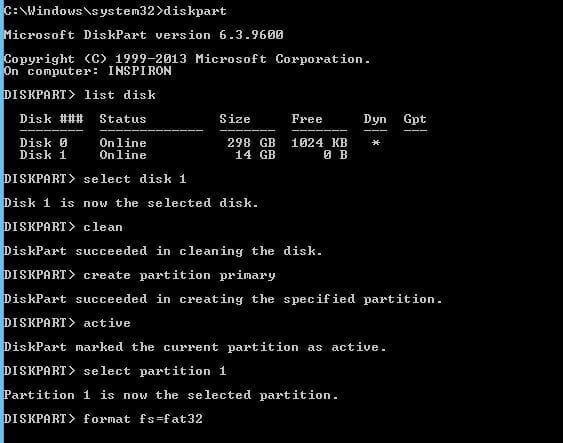
Depending on whether your card appears in Windows Explorer or not, your options will vary. If it does, right-click on it, choose Properties, then the Tools tab. Click on Check and Windows will scan the card for errors and try to fix them. However, if the SD card doesn’t appear in Explorer, search the Start menu for Disk Management.
In this tool, you can see which drives Windows can ‘see’ and the list can include drives which don’t have a drive letter. If you can’t identify your SD card in the list of drives, it’s either completely dead or the card reader isn’t working properly (perhaps due to a problem with drivers).
If the SD card is there, but without a drive letter, you should be able to right-click on it and use the available options to give it a drive letter or format it to a file system that Windows can read and can then allocate a letter.

How To Fix A Corrupted Pen Drive Or SD Card Using CMD

How to Fix or Repair a Pen Drive or SD card Thats Broken or Not Recognized


An age old problem. Every computer user has faced this problem. What I speak of, is the tragedy of the corrupted USB Pen drive or SD Card. No matter what you do, at some point, your computer will simply refuse to read your USB drive. Fortunately though, there are ways to rectify this with one only needing to use a command prompt.
Step 1:
Connect the corrupted drive to your machine
Step 2:
Open the command prompt either by typing cmd in the Start menu search bar or by hitting Windows Key + R  followed by typing cmd in the dialog box that pops up.
Step 3:
In the command prompt, enter the following commands.
Type diskpart and press Enter.
Next type list disk and press Enter.
Step 4:
Then type select disk followed by the number of your disk and hit enter
Step 5:
After the disk is selected, you will need to type clean into the command prompt and hit enter.
Step 6:
Next command is creates partition primary.
Step 7:
Type active and hit enter followed by select partition 1.
Step 8:
In the last step, type format fs=fat32 and press enter. Once this step is completed you should find your USB drive working as good as new. If not, go back through the steps and see what you missed. A screenshot of how the process looks is attached below.

Friday 24 February 2017

11 Killer Android features you aren’t using, but should

  •  
  •  
  •  
  •  
  •  
  •  
  •  
killer android features android secret
  Android is stacked with so many tools and configuration options, we often overlook some of its most useful features. Sometimes they’re hiding in plain sight. Other times, they’re buried so deep, you’d never discover them without spelunking deep into submenus, groping blindly in the dark.
But don’t let that one killer feature get away. Even if you consider yourself an Android power user, you’d do well to make sure you’re familiar with every single menu, toggle and utility on this list. We’ve done our best to identify the precise locations of the features listed below, but you may have to hunt around menus a bit if your device manufacturer has excessive interface customizations.
Did we leave out that one killer, secret feature that everyone should know about? Let us know by officially submitting a tip to Greenbot. We’ll give you direct credit if we use your submission
.

Use Android Device Manager for remote security

killer android features 1adm
Use Android Device Manager for much greater control over a lost phone.
The Google Play Services framework is used to manage all sorts of back-end services, and Google updates it frequently in the background. Most of the functionality packed away in this framework is of little user-facing consequence, but there’s a lot including account sync, malware scanning, and the Android Device Manager. This feature allows you track, ring, lock, and wipe your device if you lose track of it.
By default, you can only ring and locate a device with Android Device Manager, so if you want the full gamut of features, go into your main system settings and scroll down to Security. Find the Device Administrators option, and open it to see what apps have been granted admin privileges on your phone or tablet. Checking the box next to Android Device Manager allows you to wipe and lock the device in addition to the ring and locate features.
You can remotely access Android Device Manager in a number of useful ways. If you only have one Android device, you can use any web browser to go to theAndroid Device Manager page and log into your account. From there, you can see a map of where your phone is located, and issue commands to nuke it or just lock it.
Before resorting to extreme measures, you might want to start with locating and making it ring to ensure it didn’t just slip between the couch cushions. Should you have access to more than one Android device, you can use the Android Device Manager app, which you can keep on all your devices to locate and manage the others.

Screen Recording

killer android features 2rec
Screenshots are for chumps. Show everyone else what you’re up to with a screen recording.
A subset of Android users over the years have resorted to rooting their devices to get more advanced features. Android has slowly gained features over time that make root less of a necessity. As of Android 5.0 Lollipop, there’s less reason than ever to root now that Android supports screen recording. You just need an app to take proper advantage of it.
A screen recording is simply an MP4 video file of what’s happening on your screen for the duration of the capture. There is no native tool to do this on most Android devices for some reason, but there are a ton of them in the Play Store. My personal favorite is the aptly named Rec.
Whether you’re using Rec or another app with support for Lollipop screen recording, all you need to do is accept the screen capture request when it pops up. An icon in the status bar will appear to let you know the screen recording is ongoing. Some apps have support for different resolutions and bitrates for the recording as well, but the default will be the native screen resolution of your phone or tablet.
The way you end a recording varies by app, but there’s usually a notification or you can simply put the device to sleep. One of the reasons I prefer the aforementioned Rec is that it has support for both of those options as well as shake to stop a recording.

Set your system animations to warp speed

killer android features 3anim
Why suffer even marginally slow animations when your processor can handle faster speeds?
Android devices are faster than they used to be, but you can make your experience feel even zippier with one simple tweak. Android contains a hidden developer options menu that you can enable by going into your main system settings, then navigating to About > Software Information > More > Build number. Now tap on the build number—literally, tap on it numerous times—until a small message at the bottom of the screen confirms that you’re a developer.
Now, don’t worry: This doesn’t make any modifications to your system. It just turns on the Developer Options menu back in the main settings list—so head back there and open it up. Developer Options has a ton of interesting features to play around with, but you can also mess things up pretty badly, so it’s best not to change anything you haven’t thoroughly researched. You’ve been warned!
Now back to animations. Inside Developer options, scroll down to Drawing and find Window animation scaleTransition animation scale, and Animator duration scale. These are all set to 1x by default. These animations are the eye candy you see when apps open and close, menus drop down, and more. They help cover up lag as the system catches up, but you don’t really need slow settings on a fast device. You can set all of these to 0.5x for a more snappy interface experience.

Get into your phone faster with Smart Lock

killer android features 4smart
Security doesn’t have to be a hassle.
Keeping your phone secure is important, but if you’re the one holding it, there’s no reason you have to deal with a strong lock screen every single time you drag it from your pocket. Luckily, Android 5.0 devices now have support for Smart Lock. This feature can display the easy swipe lock screen when it’s safe to do so. How does it know? Well, there are a variety of options, some more secure than others.
Smart Lock is delivered to devices via Play Services, just like Android Device Manager. The locking options will vary by device, but Nexus phones and tablets have the most. There’s Trusted Face, Trusted Location, Trusted Devices, and on-body detection. At the bare minimum, all devices should have Trusted Devices and Trusted Location.
So for example, you can have your phone set to swipe unlock at home, but take a stroll down the block or hop in the car and it will start asking for the pattern, PIN, or password lock again. The same goes for Trusted Devices—if you’re connected to a Bluetooth or NFC device you have previously marked as “trusted,” (like your car or Android Wear watch) you’ll see no secure lock screen. With Trusted Face, the device will switch seamlessly transition to swipe unlock mode if it spots you with the front camera. On-body detection is a little weird—this option keeps your phone set to swipe unlock as long as it detects it is still in your hand or pocket. Set it down, and it locks again.
Keep in mind, some OEMs really bury the Smart Lock menu a few levels deep in advanced security or privacy settings. You may also need to enable Google Play Services as a “trust agent” in the settings of some device to access Smart Lock.

Don’t just monitor data usage—control it

killer android features 5data
The trick is to receive a warning before you trip your data limit.
In our age of draconian tiered data plans and ever-increasing carrier fees, you often need to watch your mobile data consumption closely. Android has a built-in tool that helps you do this, but most users don’t use it to its full potential. The Data Usage menu is usually near the top of your system settings list (though it may be buried under a “More” heading), and can also be accessed via the network signal strength icon in Quick Settings. You can use the sliders on the usage chart to set your data limits for your chosen billing cycle.
The default behavior is simply to warn you when you reach your data limit. However, by the time you get that warning, it’s often too late to adjust your behavior and avoid overage charges or automatic throttling. A better use of the data tracking feature is to set your warning a few hundred megabytes below your limit, then enable a data limit with the checkbox right above the chart. The red line on the chart lets you set a point at which your mobile data will be shut off.

Use Wi-Fi Direct for quick file transfers

killer android features 6wifi
The SuperBeam app facillitates device-to-device file transfers at warp speed—even 45 Mbps. Ah, the wonders of Wi-Fi.
Transferring files between devices has always been a little annoying, but features like Android Beam made it easier: Just hold together two NFC-enabled devices (Android 4.1 or later), and you can transfer files across a Bluetooth link. It’s a neat trick, but transfer speeds are capped by Bluetooth bandwidth, and file type support is limited. Luckily, however, most Android devices also support Wi-Fi Direct, even though Google’s stock apps don’t make use of it.
Wi-Fi Direct is exactly what it sounds like: a protocol that can create a direct connection between two devices via Wi-Fi. You just need an app to make use of it, and there are several in Google Play. SuperBeam is probably the most powerful, and it has a free version. To get a transfer going, you just share files to Super Beam (or whatever app you’ve chosen to use) and tap phones. Wi-Fi Direct allows you to queue up multiple files in a single operation and the transfer rate can easily exceed 30 Mbps. It’s fabulous for sharing large videos or images.

Restrict background data, app by app

killer android features 7limits
Sometimes apps don’t need to be gobbling up so much data in the background.
Because Android allows apps to wake up in the background and perform activities, there’s always the possibility they’ll send and receive mobile data without your knowledge. When you’re on a low-capped data plan (or you’re just coming up on the cap) this can be an issue. Luckily, the Android Data Usage menu in your phone offers information on what’s using data in the background, and could save you from extra charges.
Below the graph of overall data usage mentioned above, you’ll find a list of all your apps organized by how much data they’ve used, starting with the most greedy offenders. Tap on any single app for details on the split between foreground and background data. If you find an app using a lot of bytes in the background, you can scroll down to the bottom of the details page and check the option to restrict background data. Note, however, that this option is only available on devices that hook into mobile data plans.
Also keep in mind that some apps won’t work as expected with this option enabled, so only use it for apps and services that aren’t respectful of your mobile data connection.

Use Owner Info to make it easier to reclaim a lost device

killer android features 8owner
Share your owner information to help do-gooders return your phone.
Having a pattern or PIN lock on your phone or tablet is always a good idea, but what happens if you lose the device, and a good Samaritan finds it and wants to return it? How is he or she supposed to know who it belongs to? Well, hidden inside the Owner Info menu, there’s an easy way to provide your identity.
The Owner Info feature will be in the Security section of the main system settings, or under Personal > Lock screen and security on newer Samsung phones. You can add any info here you want, but an email and alternative phone number are safe bets. Just check the option above the text field to have the Owner Info displayed on the lock screen. Be aware, OEMs that heavily customize the lock screen (cough, cough—HTC) sometimes do away with this feature.

Start recognizing tethered phones as hotspots

killer android features 9hotspots
It’s time your phone start treating tethered handsets with the respect they deserve.
Android devices have long included native tethering support, and most carriers have finally gotten comfortable enough with tethering to allow users on capped data plans to use the feature without paying extra. That said, an Android device connected to a tethered hotspot doesn’t know it’s using mobile data. All it sees is a Wi-Fi access point, and that can pose problems.
If you’ve set your apps to auto-update or have files automatically backed up over Wi-Fi, you could accidentally blow through most of the hotspot’s data plan in a few minutes. To avoid this, you should be teaching your devices which Wi-Fi networks are actually mobile hotspots. This will apply system-wide settings for mobile data even though, for all intents and purposes, your phone thinks it’s connected to Wi-Fi.
In the Data Usage menu, use the overflow menu button to select Network restrictions. The screen that comes up will list all the Wi-Fi networks synced with your account data. Simply flip the toggle next to the ones that are hotspots, and your device won’t abuse the data. This feature dovetails nicely with the background data restriction mentioned above.

Priority Notifications

killer android features 10priority
Don’t let your phone boss you around with notifications when you don’t want them.
Android 5.0 Lollipop added notifications to the lock screen, but that’s not the only change to Android’s traditional great notification system. You can use the priority notification system to hide content from the lock screen and control which apps can bother you and when. While awesome and powerful, this system is complicated to set up.
Notifications modes (sometimes called interruptions) on most Lollipop devices are split into all, priority, and none. None means you get no notifications, not even alarms. Priority mode allows alarms as well as whatever apps you’ve deemed important. Then there’s all, which is standard notification mode. In your Sound and notification settings, you can edit which apps have priority status, and allow priority exceptions for calls or text from certain numbers. You can switch the three interruption modes by hitting the volume toggle and tapping the None, Priority, or All indicators.
Once you get the interruptions configured, you can set up recurring interruption mode in the notification menu. This is a way to have the device toggle on none or priority mode on a schedule, for example each day at bedtime. On most devices this is called “downtime,” but sometimes it’s labeled “do not disturb.” These are very useful features, so it’s worth a few minutes of your life to set things up.

Extend (or shorten) your lock timeout

killer android features 11timeout
Is your lock screen timeout too aggresive? This screen provides relief.
Android offers a ton of security settings for locking your device. You can choose a PIN number, password, or pattern lock, or even opt for the esoteric face unlock option. Using a lock is essential for keeping unsavory characters from accessing your data if you lose your device, but it can be a pain to unlock your hardware every single time the screen shuts off. Luckily, virtually all Android devices have a feature to fix that.
In the Security menu of most devices (again, Samsung tucked it in the My Device menu) is an “Automatically Lock” option. Note, this item only shows up if you have some sort of screen security set up. Here you can designate the amount of time that triggers your device unlock—all the way from instantaneously to 30 minutes on some phones. A longer duration will allow you to wake your device instantly if it hasn’t been asleep for long. Also, the power button can often still be used to lock instantly, if you like—that’s a checkbox right under the timeout option (though it’s not on all phones).