Wednesday, 14 June 2017

Play Store Error code 194 - 3 Easy Steps

Yet another Play store error that Android Users are facing. This time it is Play Store error 194. You may come through this error message when trying to Install or update any app from google play store. The error message exactly reads like "*App name* Could not be Downloaded due to an error. (194)" Just like Below Picture.


So what happens is you try to download or Update apps from play store but as soon as you click Install, You are presented with the Message showing Error Code 194. This error prevents you to Download any application on your android device.


Reasons of Play Store Error 194


Before we go deep and see Ways or Steps that you need to Perform to fix this error, let us just see why you get this Error. So Following are few Reasons you are getting this error in your android phone.
  1. Play Store Cache.
  2. Recent update to Play Store.
  3. Your network Connection.

There might be more reasons but above 3 are the most common ones. We are not here to simply discuss the reasons, We are literally gonna walk you through all possible Solutions to get rid of Error Code 194 in Play Store.


Ways to Fix Play Store Error 194


We will Be discussing 3 Different ways to fix the error. The Method mentioned below should help you to get rid of this play store error. They are sorted by Most basic and common Method to Advance.

Method 1: Clearing Cache

One of the Common way to fix various Errors in Google play store is Clearing the App Cache. Quite often only clearing the Cache of Google play store and Google Play Services will solve the issue. 

To Clear the Cache, simply navigate to Settings > Apps/Manage Apps > Google Play Store > Clear Cache and Data. Do the same for Google play services and Google play Framework.
if you are getting this Error 194 while updating the app then Clear cache and data of the app too. This should work and should not work. So don't panic and move on to below methods.


Method 2: Remove Google Account.

There might be problem with your google account which is causing this error on your phone. So in this Method we will try to Remove the account and add it again to see what happens.
  • Go to Settings > Accounts > Tab on your Google account and remove.
  • Reboot your phone
  • Go to Settings > Accounts > Add your account again and see if this solves the issue.

Method 3: Uninstall Play Store Update.

Play store updates itself whenever an update is available. Due to recently updated Play store, many a times it conflicts with apps and you get this and other kinds of errors. The Trick here is to Uninstall Play Store updates.

Navigate to Settings > Apps > Google Play store > Tap on the button that says Uninstall updates. This will uninstall the updates and you will now have your google play store version when it was first installed on your device. 

Now try and install the same app that was giving you Error Code 194 on your device. if this solves the issue then thank me Later or else checkout the Bonus Method that i am sharing below.

Free WannaCry Ransomware Decryption Tool

Free WannaCry Ransomware Decryption Tool


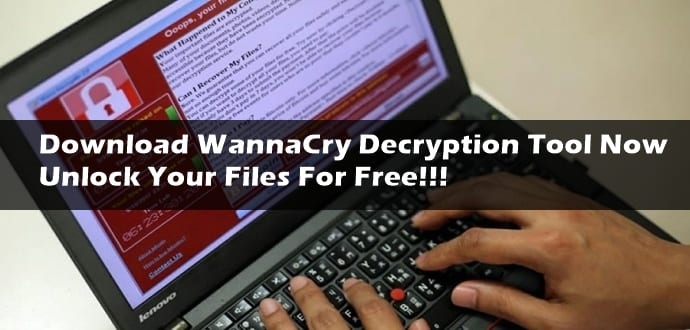
No need to pay ransomware; WannaCry decryption tool is available for free on GitHub

Researchers have finally been able to create a decryptor for the WannaCry ransomware that has affected more than 3,00,000 computers in 150 nations since its attack on computers running the Microsoft Windows operating system last Friday. For those unfamiliar, the WannaCry ransomware cryptoworm encrypts data and demands ransom payments from the infected computers in the Bitcoin cyrptocurrency.
Adrien Guinet, a French security researcher from Quarkslab, has discovered a method for finding the ransomware’s decryption key making use of a flaw in which WannaCry functions, according to The Hacker News.
Basically, WannaCry encryption creates a pair of keys – “public” and “private”. While the ransomware uses prime numbers to generate a “public” key, the “private” key is for encryption and decryption of the system files. WannaCry erases the keys from the system, thus compelling the victim to pay $300 to the cybercriminals.
However, Guinet found out that WannaCry “does not erase the prime numbers from memory before freeing the associated memory.” As a result, it allows a chance to retrieve the prime numbers and hence, generate the private key for decryption.
Using this information, Guinet released a tool called “WannaKey” that recovers the private key used to encrypt files on an infected system, allowing the contents of the files to be decrypted without paying the ransom demanded by WannaCry’s creators. The WannaKey decryption tool is available for free and works on Windows XP operating system.
However, the tool will only work on those affected computer that haven’t been rebooted after the attack or for computers with associated memory that have not been erased or allocated by some other processes, added Guinet.
Based on Guinet’s findings, another security researcher named Benjamin Delpy has created ‘WanaKiwi’, a tool that can unlock WannaCry infected systems. While it is similar to WannaKey in the way it functions, it is however compatible with Windows XP, Vista, 7, Server 2003, and Server 2008, and can run using the command prompt.

Users who are infected by the virus can download WannaKey tool or WannaKiwi tool fromGitHub and try it on their affected Windows.

Ways to recover data from a corrupt or damaged Memorycard card

Ways to recover data from a corrupt or damaged MicroSD card


SD cards have become the most convenient mode for data storage in devices such as smartphones, tablets, digital cameras, etc., as they are not only small in size but also light-weight and versatile. They can be used to store important files, images, and videos.But during the course of their use sometimes you are unable to access the files/images/videos or music stored on them. This happens because the data on SD cards gets accidentally deleted, or corrupted, formatted or damaged, and all the stored documents, photos, videos, and the music gets wiped off.
Such situations can be nightmarish and heart wrenching for the user. The very thought of losing important files/videos/images/music can be scary, but thankfully there are ways that can help you recover your data from the corrupted or damaged SD card.
In this article, we will provide tips on how you can recover files including photos, videos, and documents. You can reinstall lost apps and, if they come from a legal source, music files can be replaced free of charge.

Things you need to do before you start:-

1. Refrain from formatting the SD card, if you want to retain any of the photos on it.
2. Try using a different card reader. For instance, if you have inserted an SD card into your laptop or PC’s built-in slot and nothing is happening, then try using a different computer or a USB card reader. There are chances that the reader could be at fault and not the card. If this is the case, then look to buy a USB SD card reader online that accepts both microSD and standard SD cards.

File recovery software

There are several free SD card recovery software available in the market that claim to recover from corrupt or ‘dead’ memory cards. We have explained step by step how to use free EaseUS Data Recovery Wizard that helps you to easily and quickly get lost data back from memory card, Micro SD card, CF card or SDHC card etc. This SD card recovery tool can be applied to recover deleted, formatted, corrupted or lost pictures, music files, videos and other more important data.
If you are not comfortable using EaseUS Data Recovery Wizard, then you can try any other file recovery apps including MiniTool Data Recovery.

Points to remember:-

 Using such software does not guarantee the restoration of your lost files, as in some cases the original names of the file may be lost, while in some you may be able to rename the recovered files with no problem.
 Also, note that some free recovery programs have a limit on the number of files or amount of data they will recover. Therefore, check for any limitations before downloading. For instance, in the case of EaseUS Data Recovery Wizard, if your lost SD card files or data are more than 2GB, then you need to upgrade this free SD card recovery software into a pro version (EaseUS Data Recovery Wizard Pro) so that you can restore as many files as you want.
 Beware of additional unwanted programs that may get installed along with the free SD card recovery software. Never use the ‘Recommended’ installation option. Always, select ‘Manual’ and read each screen carefully, and opt out of search bars and other software.
Another free recovery program is ZAR (Zero Assumption Recovery), which is a comprehensive read-only data recovery solution. ZAR tools extract data from the damaged HDD to another medium (typically an additional HDD), leaving the original disk intact. Typical recoverable damage profiles include volumes accidentally formatted, corrupted by a virus or ill-behaved software, due to power failure or as a side effect of overclocking and so on.

How to install ZAR:-

1. Go to the ZAR website, click on the ZAR Download page, and download the installer for General File Recovery (there should be a file named zarXXsetup.exe where XX = the current version number).
2. Then insert the damaged SD card into your PC’s card reader and launch ZAR. (Since you may have to disable your PC’s security software, it is recommended that you disable the internet connection also).
3. When prompted, click the Image Recovery (Free) option. This will help you to recover photos from an SD card.
4. ZAR will now search for installed devices. You need to point it towards the offending SD card, choose the correct disk and click ‘Next’. ZAR will now analyse your SD card, which may take a few minutes.
5. Once completed, a list of all the recovered files will show up. On most of the SD cards, there are chances that clicking the ‘Root’ checkbox will choose all the images.
6. Click Next, and you can then choose the folder to place the recovered files. By default, this will be the same as the folder you have selected to save (so ‘Root’, in all likelihood).
7. Remember to select a destination folder for the recovered files when prompted for it. Ensure that you select the one on your PC’s hard disk and not the one on the corrupt SD card, since that won’t work.
8. Allow a few minutes for the files to copy on the destination folder. Once completed, go to the destination folder that you have chosen. You should be able to find most if not all of the files that you wanted to recover. There are chances that original names of the file may be lost, so you may have to rename them which could include adding a file extension so they are correctly recognised by Windows.

Tips for fixing a dead SD card:-

An SD card can be damaged in many ways making it difficult to access the data. For instance, the thin plastic shells of the standard size SD cards make them fragile and can be easily broken or damaged if carried unprotected in pocket or bag. Or at times, the little write-protection switch can fall out, making it difficult for the SD card to work in a camera or any other device that needs to be able to write to it.
In this state, regardless of the reason behind an SD card being write-protected, you won’t be able to delete the files, since the file allocation table needs to be changed and this involves writing to the card.
If your card is physically ok, and the switch (where present) is in the ‘unlocked’ position, you can try one of Windows’ built-in tools to attempt to fix it.
Depending on whether your card appears in Windows Explorer or not, your options will vary. If it does, right-click on it, choose Properties, then the Tools tab. Click on Check and Windows will scan the card for errors and try to fix them. However, if the SD card doesn’t appear in Explorer, search the Start menu for Disk Management.
In this tool, you can see which drives Windows can ‘see’ and the list can include drives which don’t have a drive letter. If you can’t identify your SD card in the list of drives, it’s either completely dead or the card reader isn’t working properly (perhaps due to a problem with drivers).
If the SD card is there, but without a drive letter, you should be able to right-click on it and use the available options to give it a drive letter or format it to a file system that Windows can read and can then allocate a letter.

How To Fix A Corrupted Pen Drive Or SD Card Using CMD

How to Fix or Repair a Pen Drive or SD card Thats Broken or Not Recognized


An age old problem. Every computer user has faced this problem. What I speak of, is the tragedy of the corrupted USB Pen drive or SD Card. No matter what you do, at some point, your computer will simply refuse to read your USB drive. Fortunately though, there are ways to rectify this with one only needing to use a command prompt.
Step 1:
Connect the corrupted drive to your machine
Step 2:
Open the command prompt either by typing cmd in the Start menu search bar or by hitting Windows Key + R  followed by typing cmd in the dialog box that pops up.
Step 3:
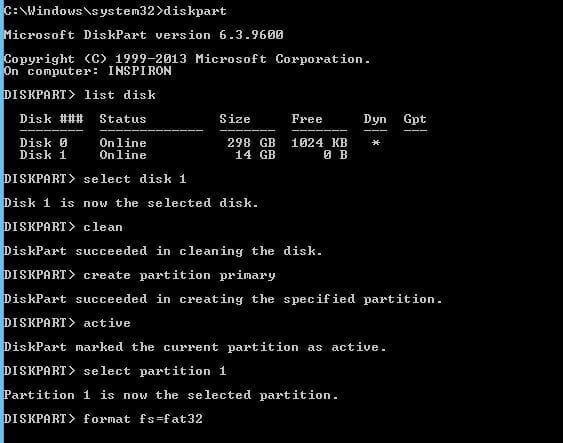
In the command prompt, enter the following commands.
Type diskpart and press Enter.
Next type list disk and press Enter.
Step 4:
Then type select disk followed by the number of your disk and hit enter
Step 5:
After the disk is selected, you will need to type clean into the command prompt and hit enter.
Step 6:
Next command is creates partition primary.
Step 7:
Type active and hit enter followed by select partition 1.
Step 8:
In the last step, type format fs=fat32 and press enter. Once this step is completed you should find your USB drive working as good as new. If not, go back through the steps and see what you missed. A screenshot of how the process looks is attached below.